7.1 Formation of Images by Lenses
Convex Lenses and Concave Lenses
- A lens is a transparent medium, such as glass, with one or two curved surfaces.
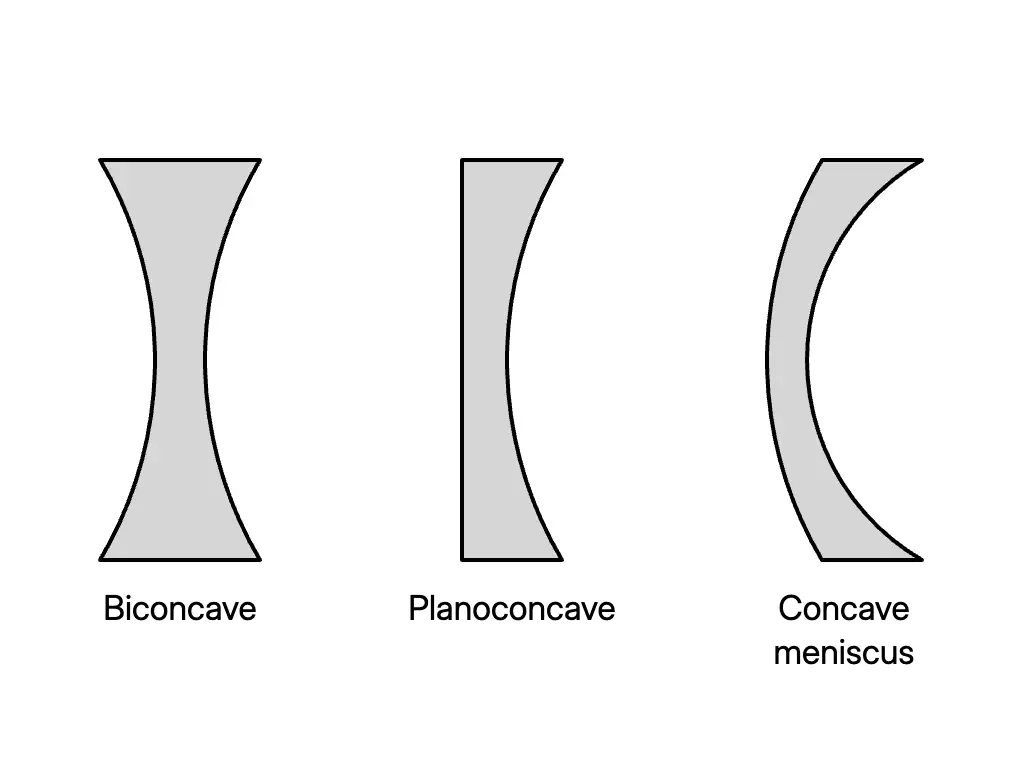
- The two main types are convex lenses and concave lenses.
| Lens | Forms |
|---|---|
| Convex lens | Biconvex, planoconvex, convex meniscus |
| Concave lens | Biconcave, planoconcave, concave meniscus |
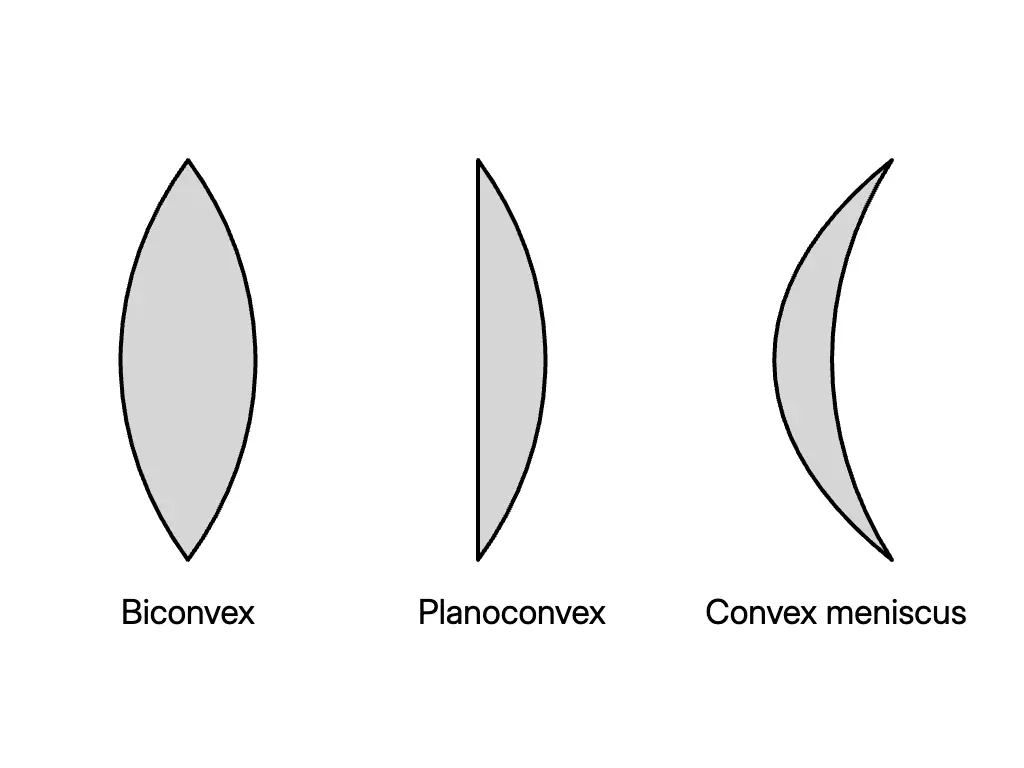
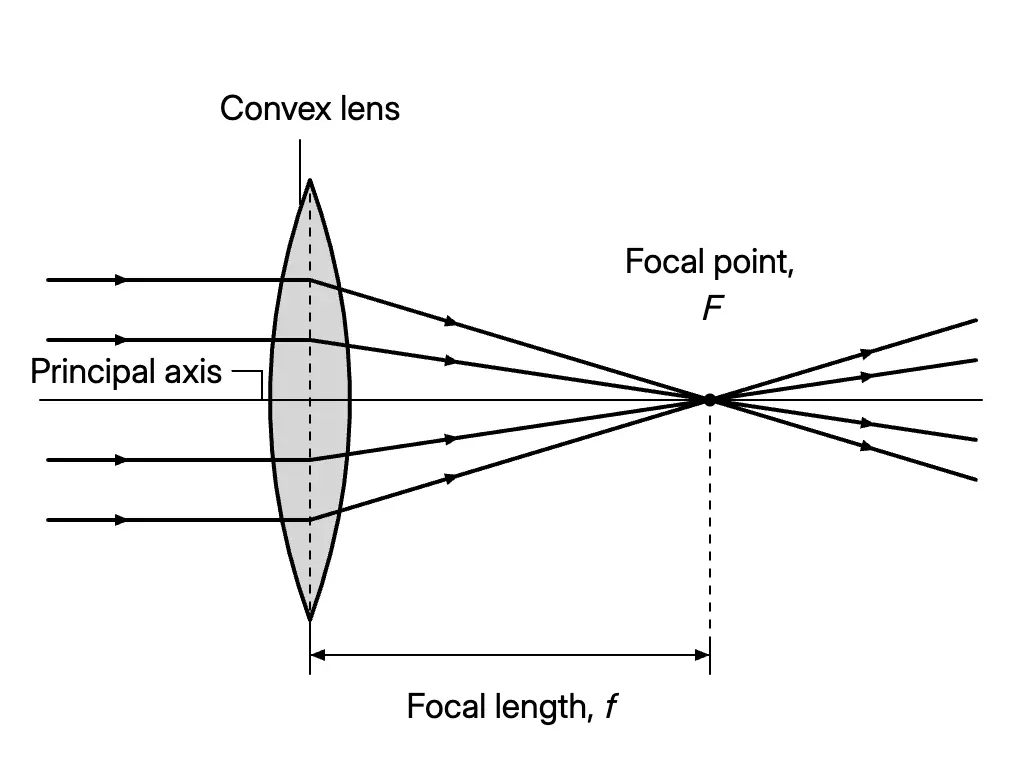
- Parallel light rays converge after passing through a convex lens; a convex lens is a converging lens.
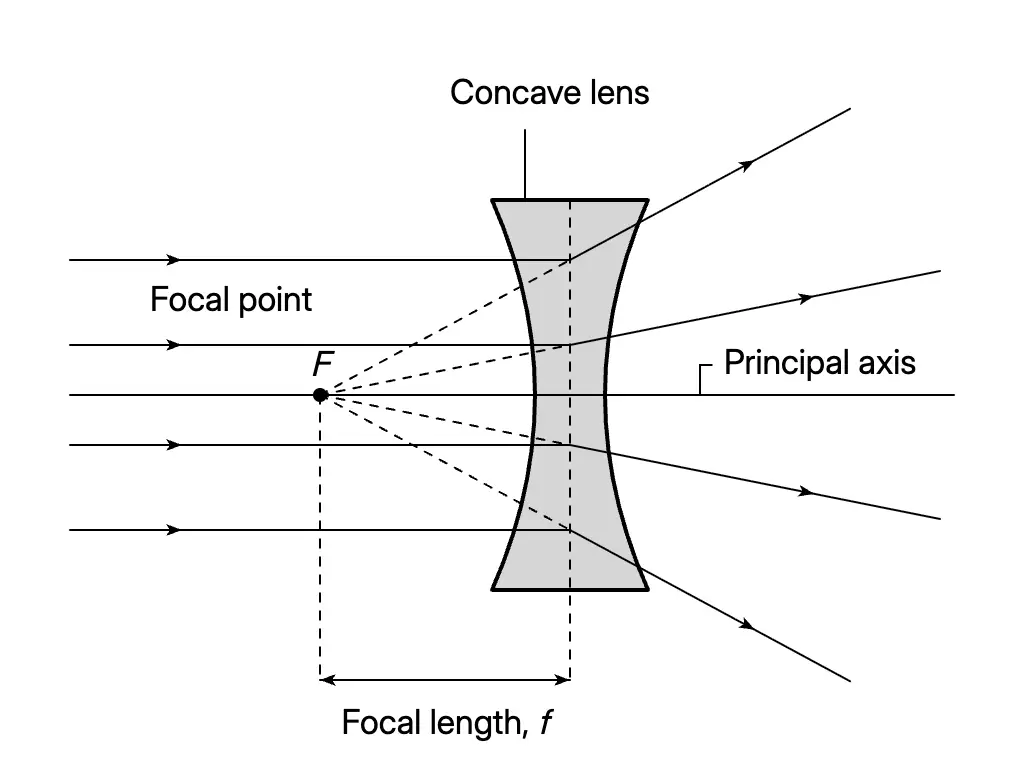
- Parallel light rays diverge after passing through a concave lens; a concave lens is a diverging lens.
- Focal point, of a convex lens: point where light rays parallel to the principal axis converge after passing through the lens.
- Focal point, of a concave lens: point where the diverging rays appear to originate when extrapolated backwards.
- Focal length, : distance between the focal point, , and the optical centre, .
Activity 7.1: Properties and Focal Points of Lenses
Aim: Use an Optical Ray Kit to:
- show that a convex lens is a converging lens and a concave lens is a diverging lens;
- determine the focal points of convex and concave lenses.
Material: White paper,
Apparatus: Ray box, cylindrical biconvex lens, cylindrical biconcave lens, triple-slit plate, ruler and pencil
Condition: Carry out the activity in the dark so that the paths of the light rays can be seen clearly.
- Set up the ray box, triple-slit plate and cylindrical biconvex lens on the white paper.
- Trace the convex lens; mark its centre as the optical centre, .
- Direct three parallel light rays towards the convex lens and observe their paths before and after the lens.
- On each path, make one mark near the lens and another farther away; remove the lens.
- Join each pair of marks with a straight line.
- Mark the intersection of the three refracted rays as the convex lens’s focal point, .
- Repeat steps 1–5 with the concave lens.
- Extrapolate the diverging rays backwards until they intersect.
- Mark this intersection as the concave lens’s focal point, .
Observations and conclusions:
- The rays meet after passing through the convex lens: it is a converging lens with a real focal point.
- The rays spread out after passing through the concave lens. Their backward extensions meet on the incident-light side: it is a diverging lens with a virtual focal point.
Optical Terms
| Term | Meaning |
|---|---|
| Optical centre, | Point at the centre of a lens. A light ray passing through it does not refract. |
| Principal axis | Straight line through the optical centre and focal point, . |
| Axis of lens | Straight line through the optical centre and perpendicular to the principal axis. |
| Focal point, | Point on the principal axis where parallel rays converge after a convex lens, or appear to diverge from after a concave lens. |
| Focal length, | Distance between and . |
| Object distance, | Distance between the object and . |
| Image distance, | Distance between the image and . |
Activity 7.2: Determining the Focal Length of a Convex Lens
Aim: Determine the focal length of a convex lens using a distant object.
Apparatus: Convex lens, lens holder, white screen and metre rule
Principle: Light rays from a distant object are parallel. After passing through a convex lens, they converge at the focal point; therefore, the distance from the lens centre to a sharp image on the screen estimates .
- Place the convex lens in a lens holder and position it towards a distant object through an open window.
- Place a white screen behind the lens.
- Move the screen until a sharp image of the distant object forms on it.
- Measure the distance between the centre of the convex lens and the screen with a metre rule.
- Record this distance as the focal length, , of the convex lens.
Result: The image on the screen is real, inverted and diminished. A concave lens cannot be used in this arrangement because it forms a virtual image that cannot be projected onto the screen.
Constructing Ray Diagrams
Use two principal rays from the top of the object. The image is located where the refracted rays intersect, or where their backward extensions intersect.
| Lens | Two principal rays |
|---|---|
| Convex lens | (1) A ray parallel to the principal axis refracts through on the opposite side. (2) A ray directed towards continues straight without refraction. |
| Concave lens | (1) A ray parallel to the principal axis refracts and appears to come from on the same side as the object. (2) A ray directed towards continues straight without refraction. |
- A real image forms where actual refracted rays intersect and can be projected onto a screen.
- A virtual image forms where backward extensions of refracted rays intersect and cannot be projected onto a screen.
- Draw the backward extensions of refracted rays as construction lines.
Images Formed by a Convex Lens
| Object position | Image position and characteristics |
|---|---|
| Farther than | Between and ; real, inverted, diminished |
| At | At ; real, inverted, same size as the object |
| Between and | Farther than ; real, inverted, magnified |
| At | At infinity; virtual, upright, magnified |
| Between and | Farther from the lens than on the same side as the object; virtual, upright, magnified |
- A convex lens acts as a magnifying glass when the object is between and , that is, < .
Images Formed by a Concave Lens
For any object distance, the image is:
- virtual;
- upright;
- diminished;
- between the object and the concave lens, specifically between and .
Answer practice questions to test your knowledge
Practice